

Mastering Data Merging in Power Query: A Step-by-Step Guide
Data is the lifeblood of modern business, and the ability to combine, analyze, and transform that data is key to deriving meaningful insights. For many professionals working with Power BI, Power Query has emerged as an indispensable tool for data manipulation. In this blog, we’ll dive deep into the process of data merging using Power Query, guiding you through each step to help you master this essential skill.
What is Power Query?
Power Query is a data connectivity and transformation tool available in Excel, Power BI, and other Microsoft products. It allows users to import, clean, transform, and combine data from multiple sources in a user-friendly environment. With its intuitive interface and robust functionality, Power Query simplifies complex data preparation tasks that would otherwise require advanced formulas or VBA coding.
Why Merge Data?
In many cases, data exists in separate tables or sources, and merging these datasets is essential for comprehensive analysis. For example, you might have sales data in one table and customer details in another. Merging these tables enables you to conduct a more complete analysis, such as tracking customer purchasing patterns or segmenting data by demographics. Data merging is crucial for creating unified views that drive business insights and informed decision-making.
Getting Started with Data Merging
Before we jump into the step-by-step guide, ensure you have your data ready. For this tutorial, we’ll assume you have two tables:
- Orders: Contains sales transactions, including columns such as OrderID, CustomerID, Product, Quantity, and OrderDate.
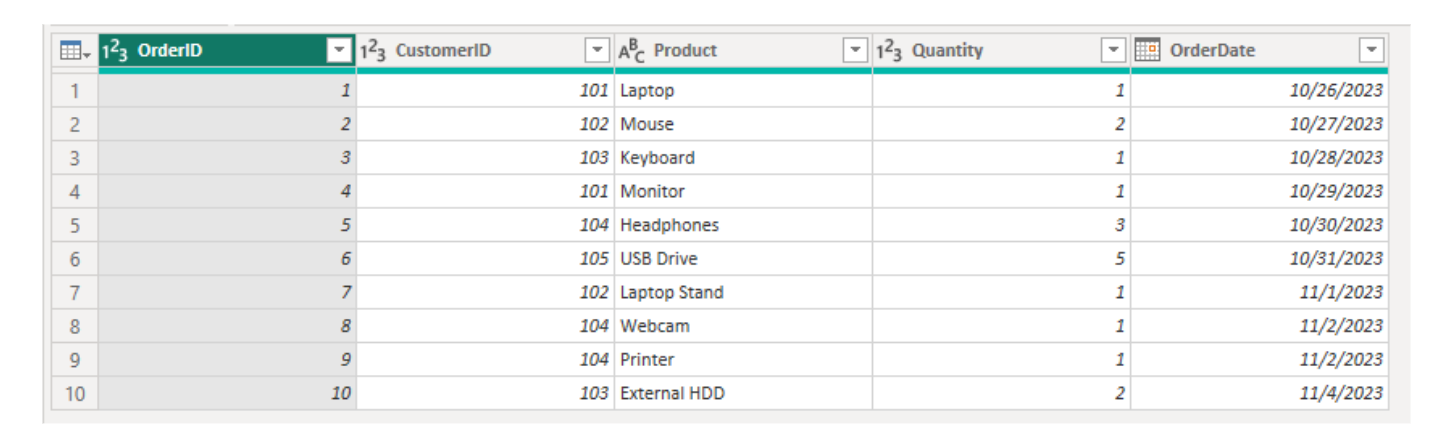
- Customers: Contains customer information, including columns such as CustomerID, FirstName, LastName, Email, and City.

Our goal is to merge these tables to create a combined view that provides insights into customer behavior along with transaction details.
Step 1: Importing Your Data into Power Query
- Open Excel and Load Your Data:
- Ensure that your data is formatted as tables. You can convert a range of data into a table by selecting it and pressing Ctrl + T.
- Go to the Data tab and click on Get Data. Choose the source (e.g., From Table/Range) to load your tables into Power Query.
- Access Power Query Editor:
- Once you have imported your data, it will appear in the Power Query Editor. Here, you can preview and make transformations to your data before merging.
Step 2: Preparing Your Data for Merging
Before merging, it’s important to clean and prepare your datasets to ensure a smooth process:
- Check for Consistency:
- Ensure that the columns you intend to use as keys for the merge are formatted consistently in both tables. For instance, if you are merging by Customer ID, both tables should have the Customer ID column with matching data types (e.g., text or number).
- Remove Unnecessary Columns:
- If your tables contain extra columns that are not needed for the merge, consider removing them to simplify the process. This can be done in Power Query by selecting the column header, right-clicking, and choosing Remove.
- Rename Columns if Necessary:
- Sometimes, columns that should match have different names. Use the Rename function to align them.
Step 3: Merging the Data
Now that your data is clean and ready, it’s time to merge the tables:
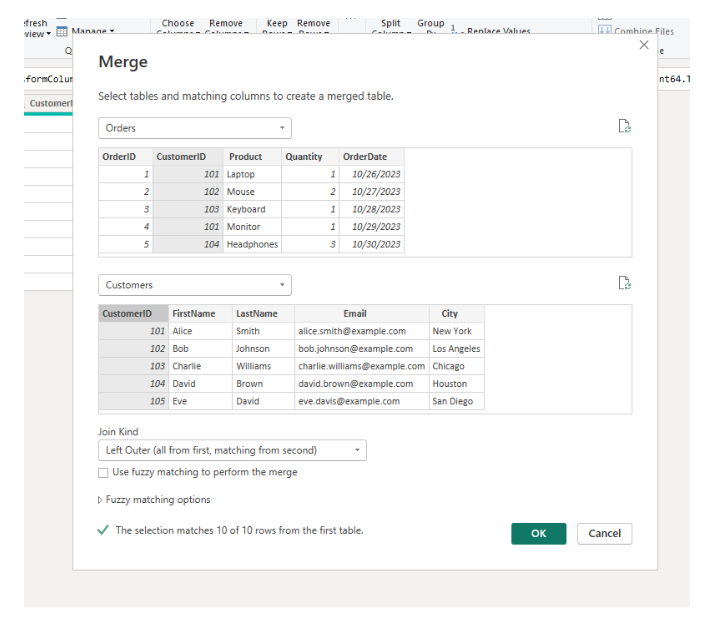
- Initiate the Merge:
- In the Power Query Editor, select the Order table.
- Click on Merge Queries from the Home tab. If you need to create a new query, choose Merge Queries as New else choose Merge Queries. A dialog box will open prompting you to choose the Customer table to merge with.
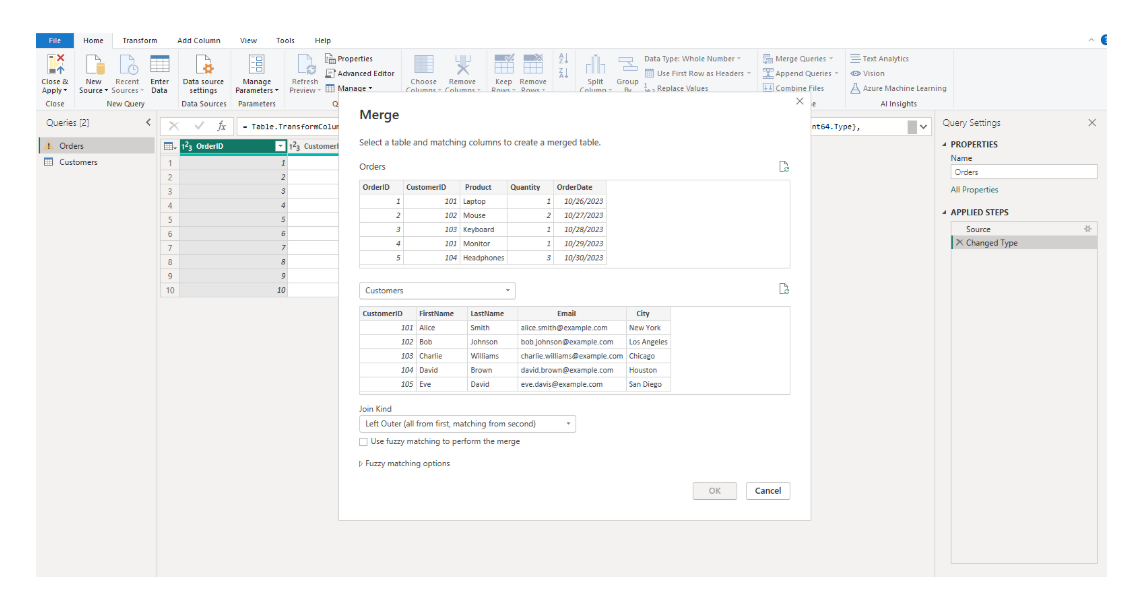
- Select the Matching Columns:
- Choose the column that will act as the key for the merge from both tables (Customer ID). You can select multiple columns if your merge requires composite keys.
- Choose the type of join that suits your needs. The most common join types include:
- Left Outer Join: Returns all records from the first table and matched records from the second table.
- Right Outer Join: Returns all records from the second table and matched records from the first table.
- Full Outer Join: Returns all records when there is a match in either table.
- Inner Join: Returns only records that have matching values in both tables.
- For our example, a Left Outer Join is often suitable when you want to keep all transactions while appending customer details where available as shown in figure 4.
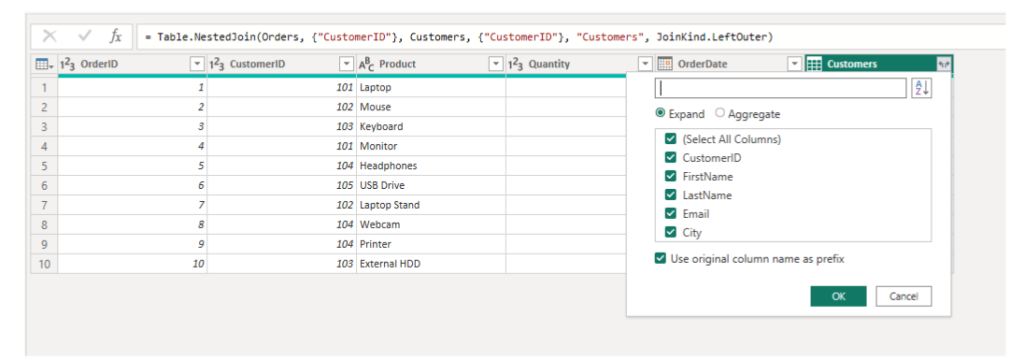
- Expand the Merged Data:
- Once the merge is complete, you’ll see a new column with a table icon representing the merged data. Click on the expand icon (a small square with arrows) in the column header as shown in figure 5
- Select the fields you want to include from the merged table. This will append the selected columns to your primary table.
Step 4: Finalizing and Loading Your Merged Data
After the merge, you can further refine your data:
- Apply Additional Transformations:
- Use Power Query’s robust transformation tools to clean, filter, or further analyze the merged data. You can add calculated columns, change data types, or remove duplicates as needed.
- Review the Data:
- Carefully review the merged dataset to ensure that all data has combined correctly and that there are no anomalies. Check for null values or mismatches that may require attention.
- Load the Data:
- Once satisfied with the merged data, click on Close & Load to push the final table back into Excel. This integrated dataset is now ready for analysis and reporting.

Benefits of Mastering Data Merging in Power Query
- Efficiency and Accuracy:
- Automating the merge process reduces the manual effort required to combine datasets and minimizes the risk of errors.
- Scalability:
- As your data grows, the processes set up in Power Query can scale accordingly. You can schedule data refreshes to keep your merged data up-to-date without manual intervention.
- Improved Data Insights:
- Merging disparate data sources provides a holistic view of your business, enabling deeper analysis and better decision-making.
- Time Savings:
- Once your queries are set up, you can reuse and modify them for future projects, saving significant time on data preparation and analysis.
Tips for Successful Data Merging
- Document Your Queries:
- Maintain a record of your query steps. This documentation is useful for troubleshooting and for sharing with colleagues.
- Consistent Data Practices:
- Standardize naming conventions, data types, and structures across your source tables. Consistency simplifies merging and reduces errors.
- Regular Data Refresh:
- Schedule regular data refreshes, especially if your underlying data is updated frequently. This ensures your merged dataset remains current and relevant.
- Leverage Community Resources:
- Power Query has a vibrant user community. Explore forums, blogs, and tutorials for additional tips and tricks to enhance your data merging skills.
Conclusion
Mastering data merging in Power Query is a powerful skill that transforms how you work with data in Excel. By following the step-by-step guide outlined above, you can efficiently combine data from multiple sources, streamline your data preparation processes, and unlock deeper insights from your unified dataset. Whether you’re preparing reports for management or conducting detailed analysis, Power Query provides a robust platform to support your data-driven decisions.
Take the time to explore the features of Power Query further, experiment with different join types, and integrate additional transformation steps to customize the process to your needs. With practice, you’ll find that merging data becomes a seamless and integral part of your analytical workflow. Happy merging, and may your data always be accurate and insightful!
This guide provides a comprehensive look into mastering data merging using Power Query. If you have any questions or need further assistance, feel free to leave a comment below or reach out on social media.